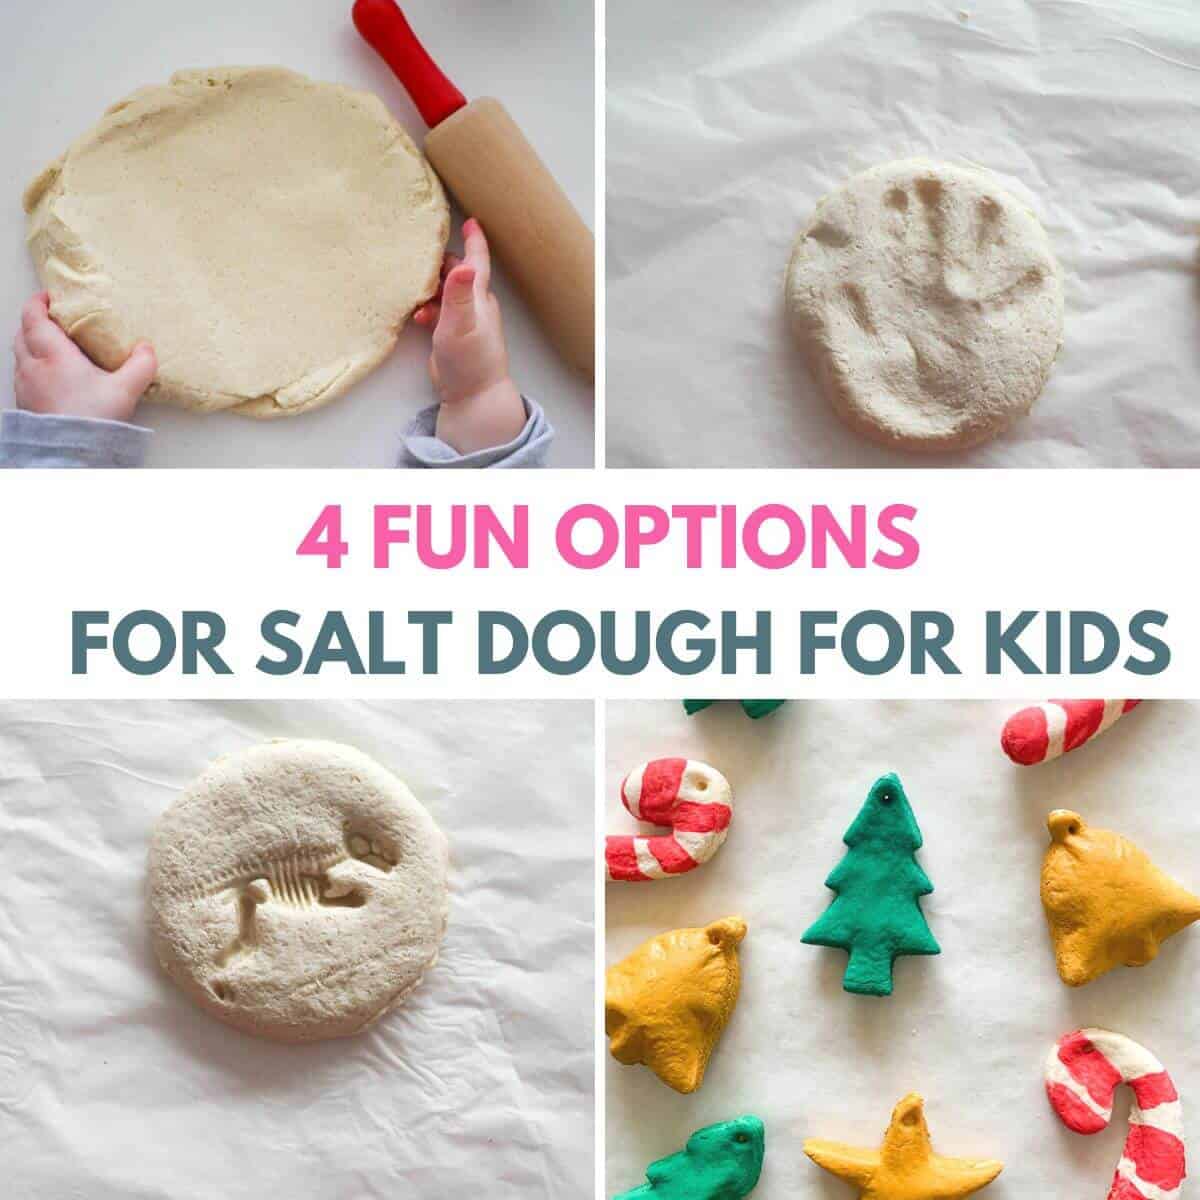
Made with 3 simple ingredients of plain flour, water and salt - perfect to make with kids and lasts for years. Great for diy salt dough ornaments, decorations, handprints, footprints, paw prints, crafts ideas or just as a play dough. With options for oven baked, air dry and also as no bake salt dough which kids can use to play with like play dough.
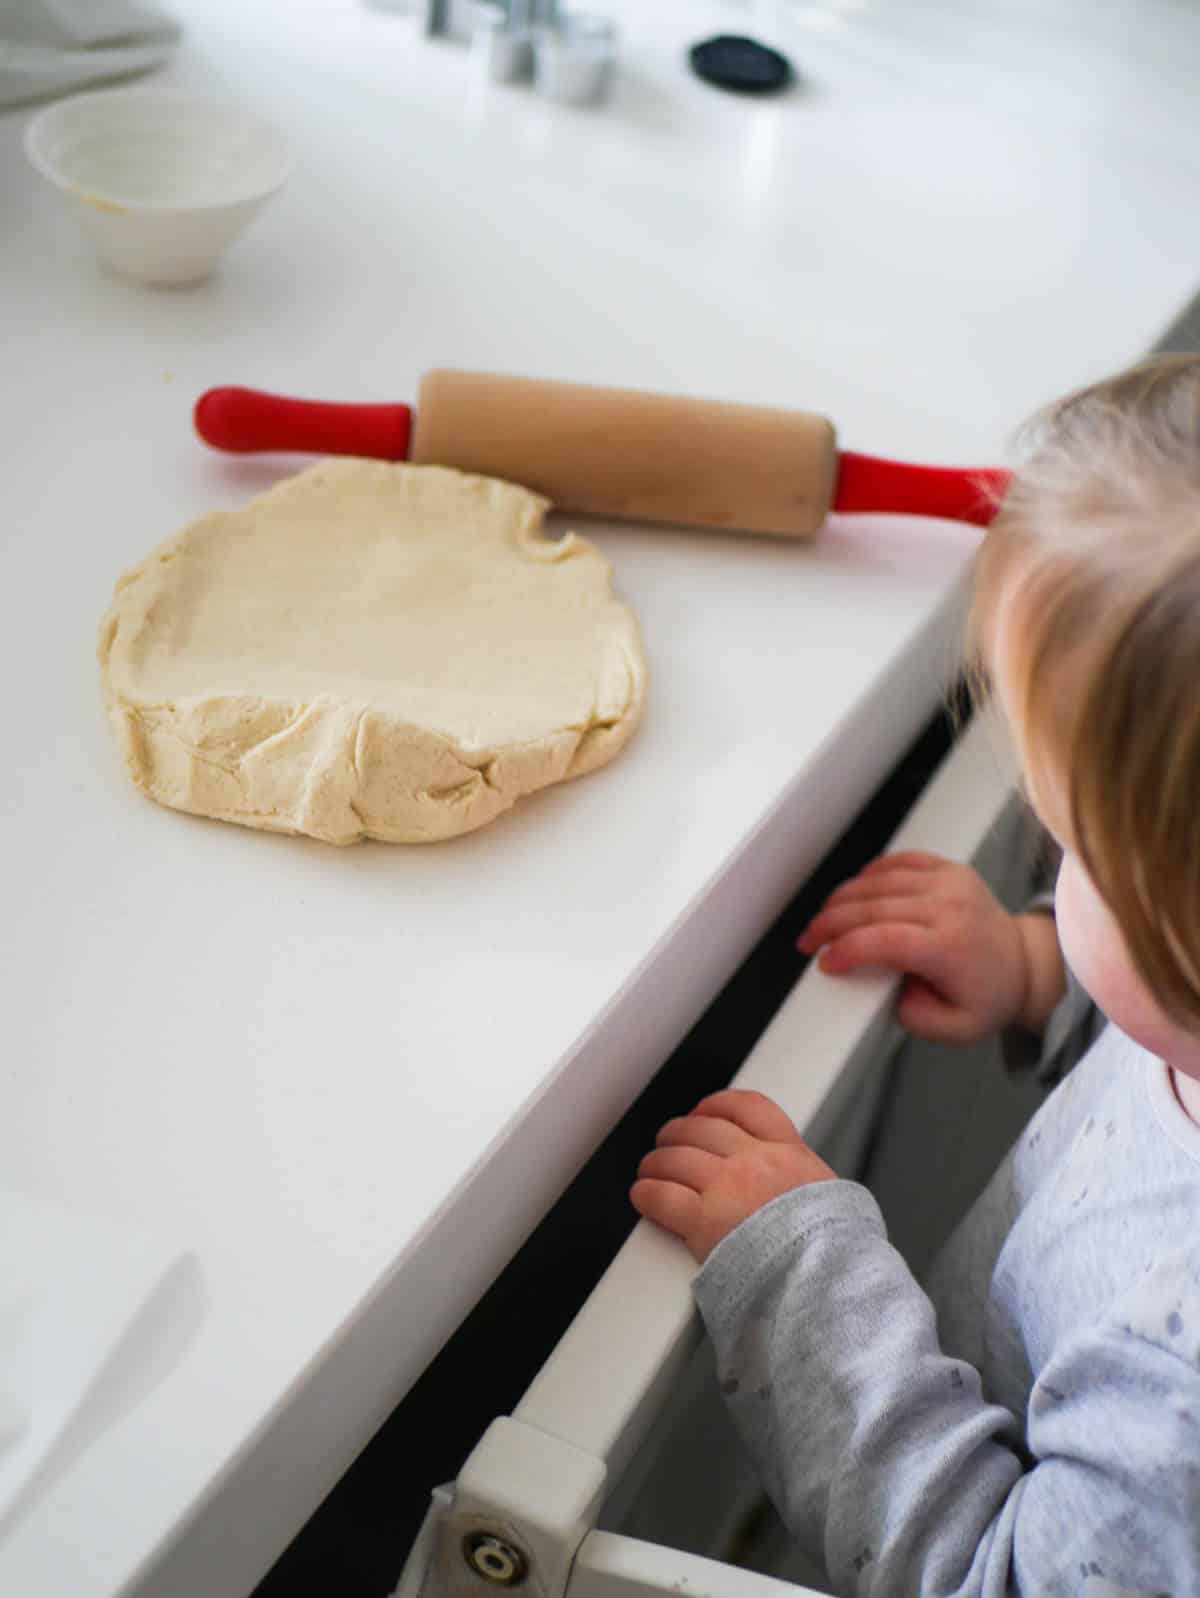
You only need a few ingredients and utensils to make this work - a large bowl for mixing, a wooden spoon, some flour, salt, and warm water. If you have a toddler, get them into a learning tower, give them the ingredients and make some memories together.
Salt dough ideas for kids
- Salt dough Christmas ornaments and Christmas crafts
- Decorations
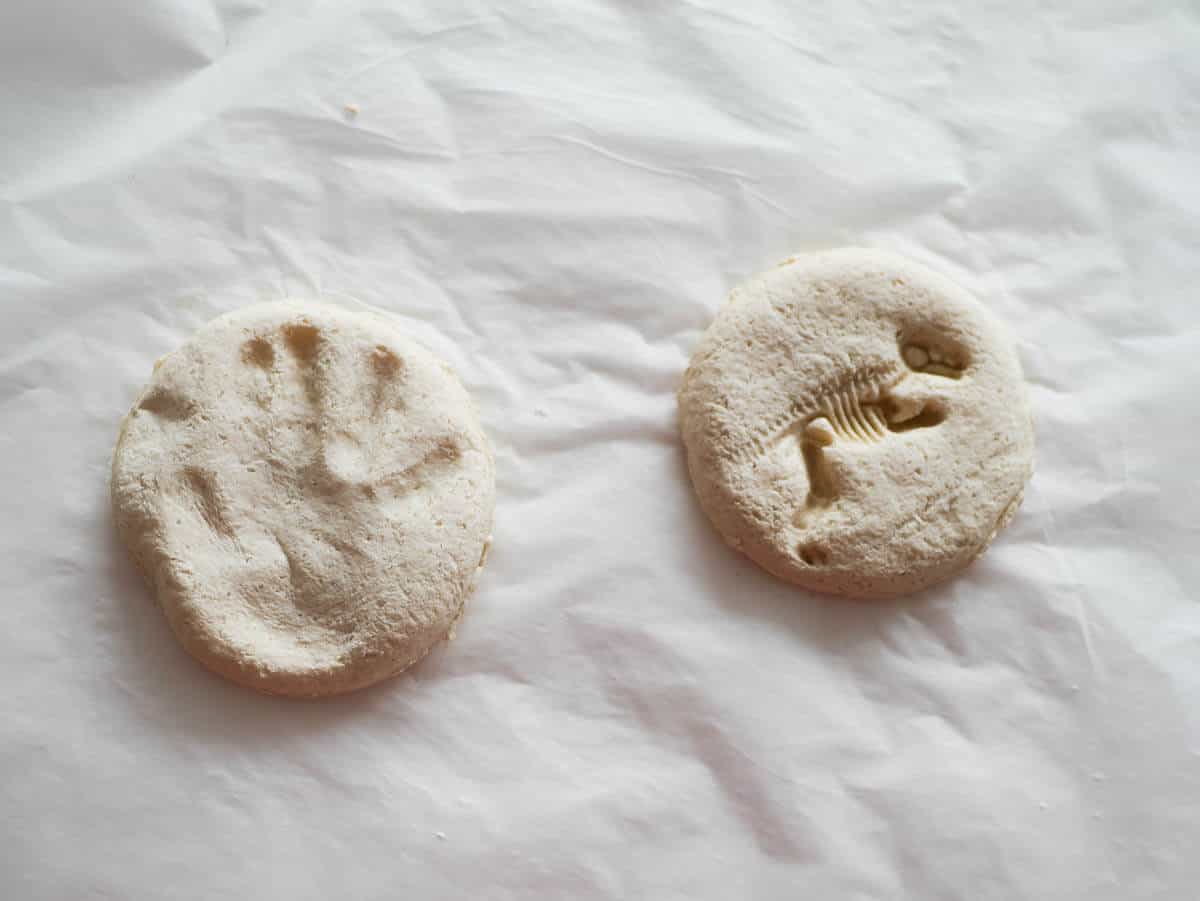
- Salt dough crafts - make an archeological game by creating dinosaur fossils
- Salt dough handprints ornaments and footprints
- Your dog's paw prints
- Salt clay recipe - no bake salt dough that can be played with for weeks
Whichever idea you choose to make, the recipe is the same.
It is a perfect indoor activity for kids before Christmas or just as a rainy day.
Simple and lasts for years. And we will take you through it step by step.
Ingredients
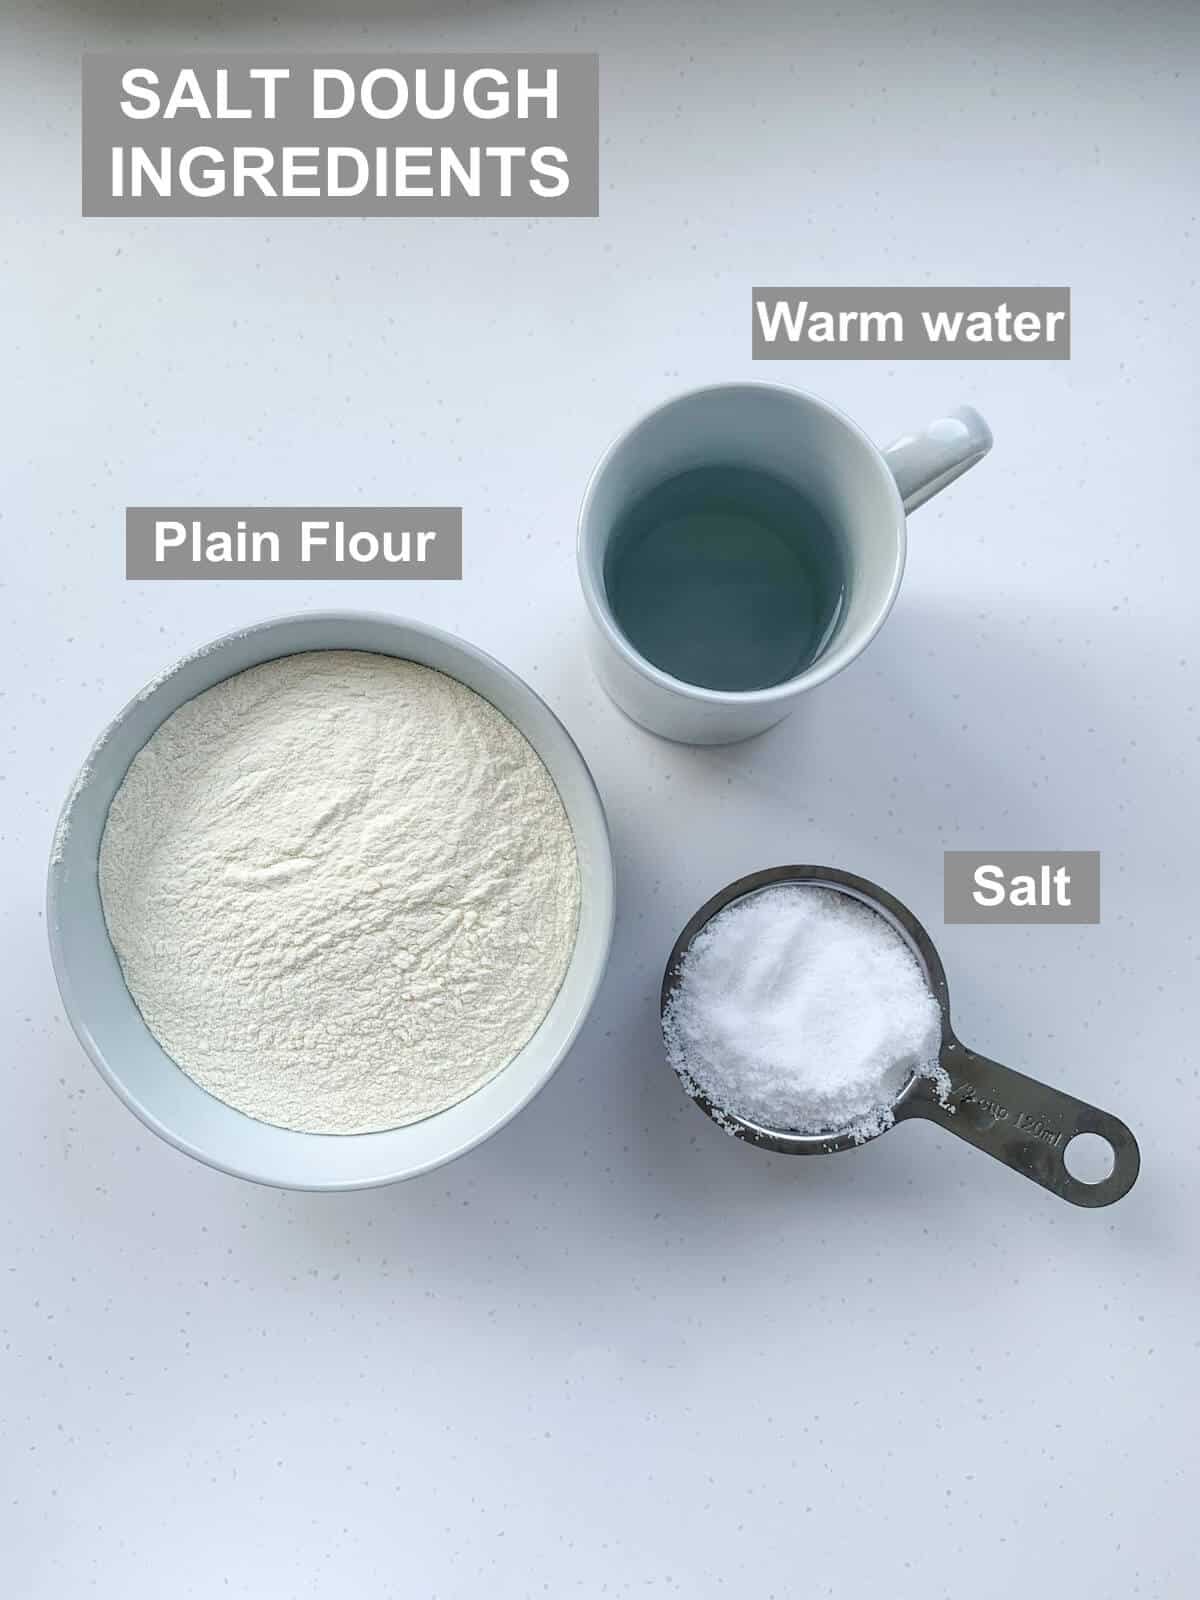
- Plain Flour - You can use any flour for this recipe but I prefer to use white plan flour because it gives a nice white color. This way you can easily add color or even leave as it is. Opt for the cheapest you can find because it really makes no difference in this recipe.
- Salt - the reason it is called salt dough. Salt is needed as a preservative. If you just had bread and water, in a few days you would find a very mouldy ornament sitting on your kitchen counter. We used table salt in this recipe, you can use any fine salt but since you won't be eating this go for the cheapest you can find.
- Warm water - helps the dough stick together easier and is much nicer to knead than cold dough.
How to make salt dough?
We will go through it step by step so we are sure you will have the best diy salt dough and a great afternoon with your kids.
The recipe starts the same and then it is up to you if you want to use it as clay, air-dry it or bake the dough.
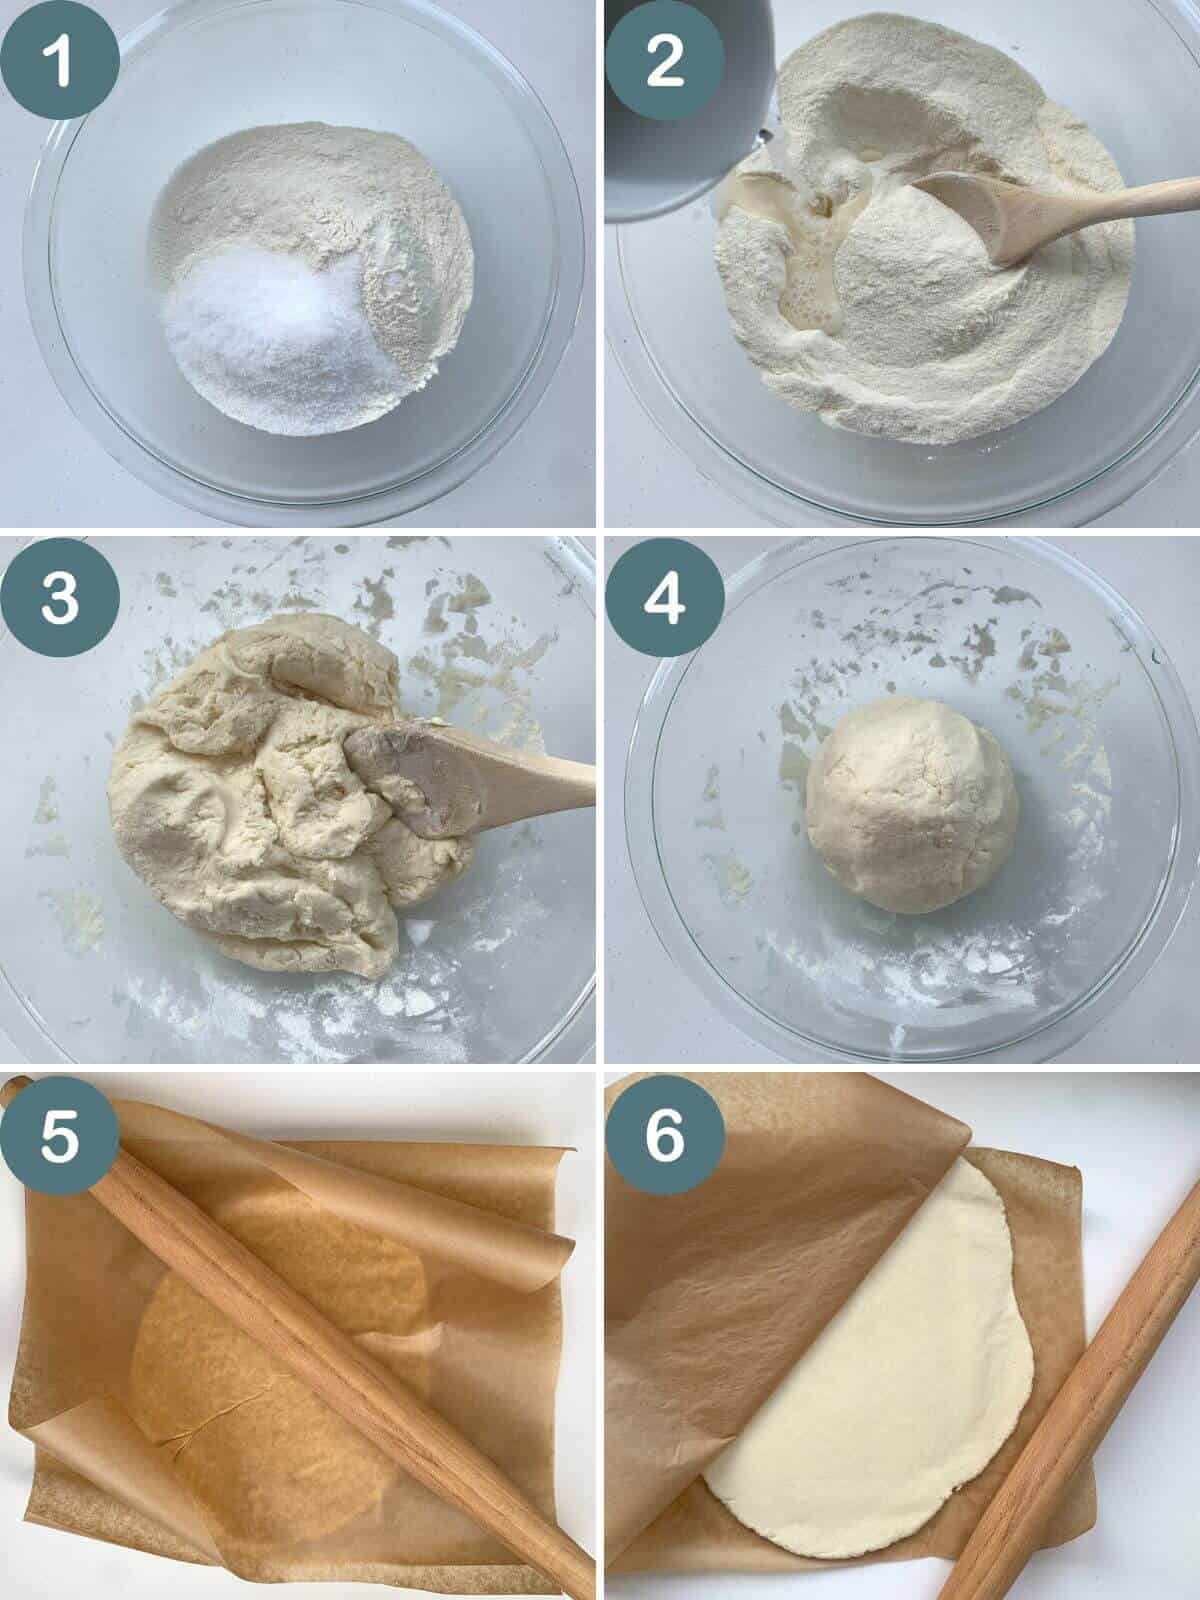
1. Take a large bowl and mix the flour and salt.
2. Add warm water bit by bit while slowly stirring.
3. Stir until a dough starts forming. If it is too loose add a bit more flour, if it is too firm add a tiny bit of water until you get the right consistency. Knead the dough.
4. You should have a nice dough ball. To use it as salt clay for play just place the dough in a sealable plastic bag and remove all the air so it does not dry out. It can last like this for weeks.
5. To make ornaments or salt dough handprints/footprints lay the dough between two pieces of parchment paper and use a rolling pin to roll out the dough and flatten it.
6. Flatten it out until it is about ¼ inch (approx. ½ cm) thick.

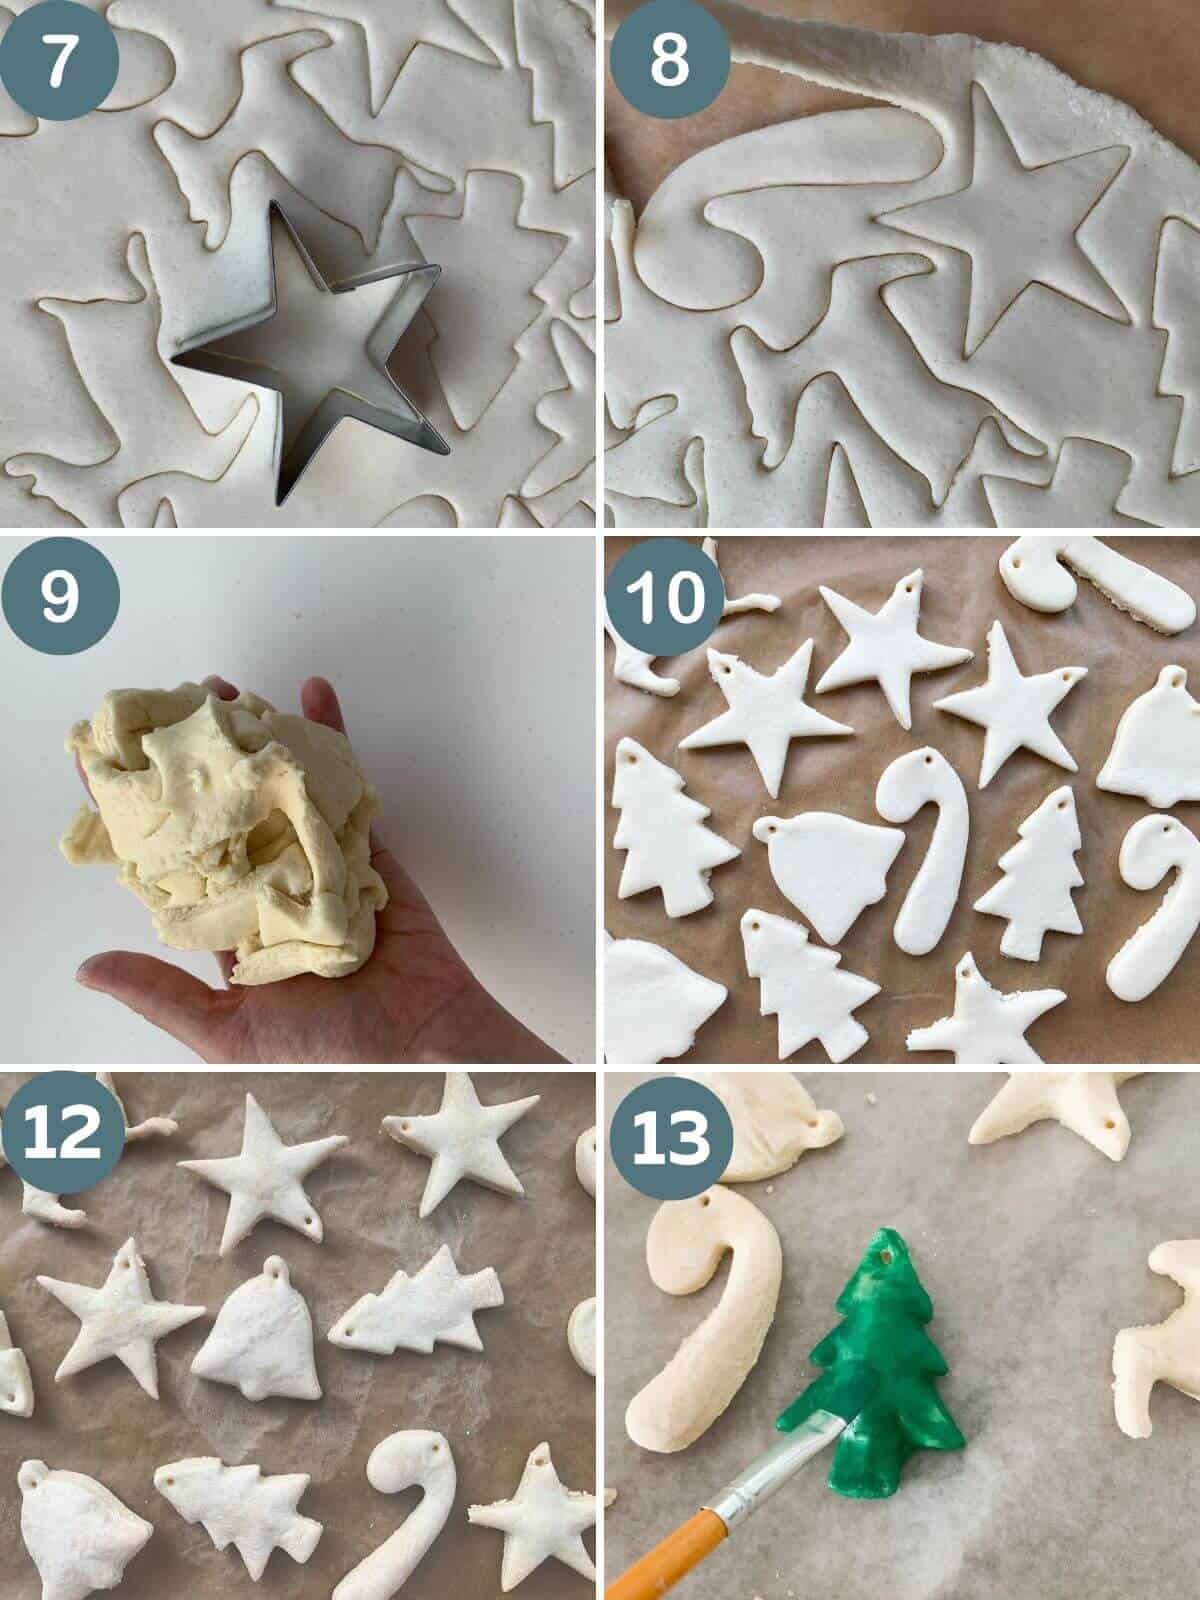
7. Create the ornaments/crafts you want:
- Handprints/ footprints / pawprints - take a cereal bowl and cut a large round shape and then press the print into it
- Crafts like dinosaur fossils - cut a round shape with a cookie cutter or larger mug and press the dinosaur shape into it
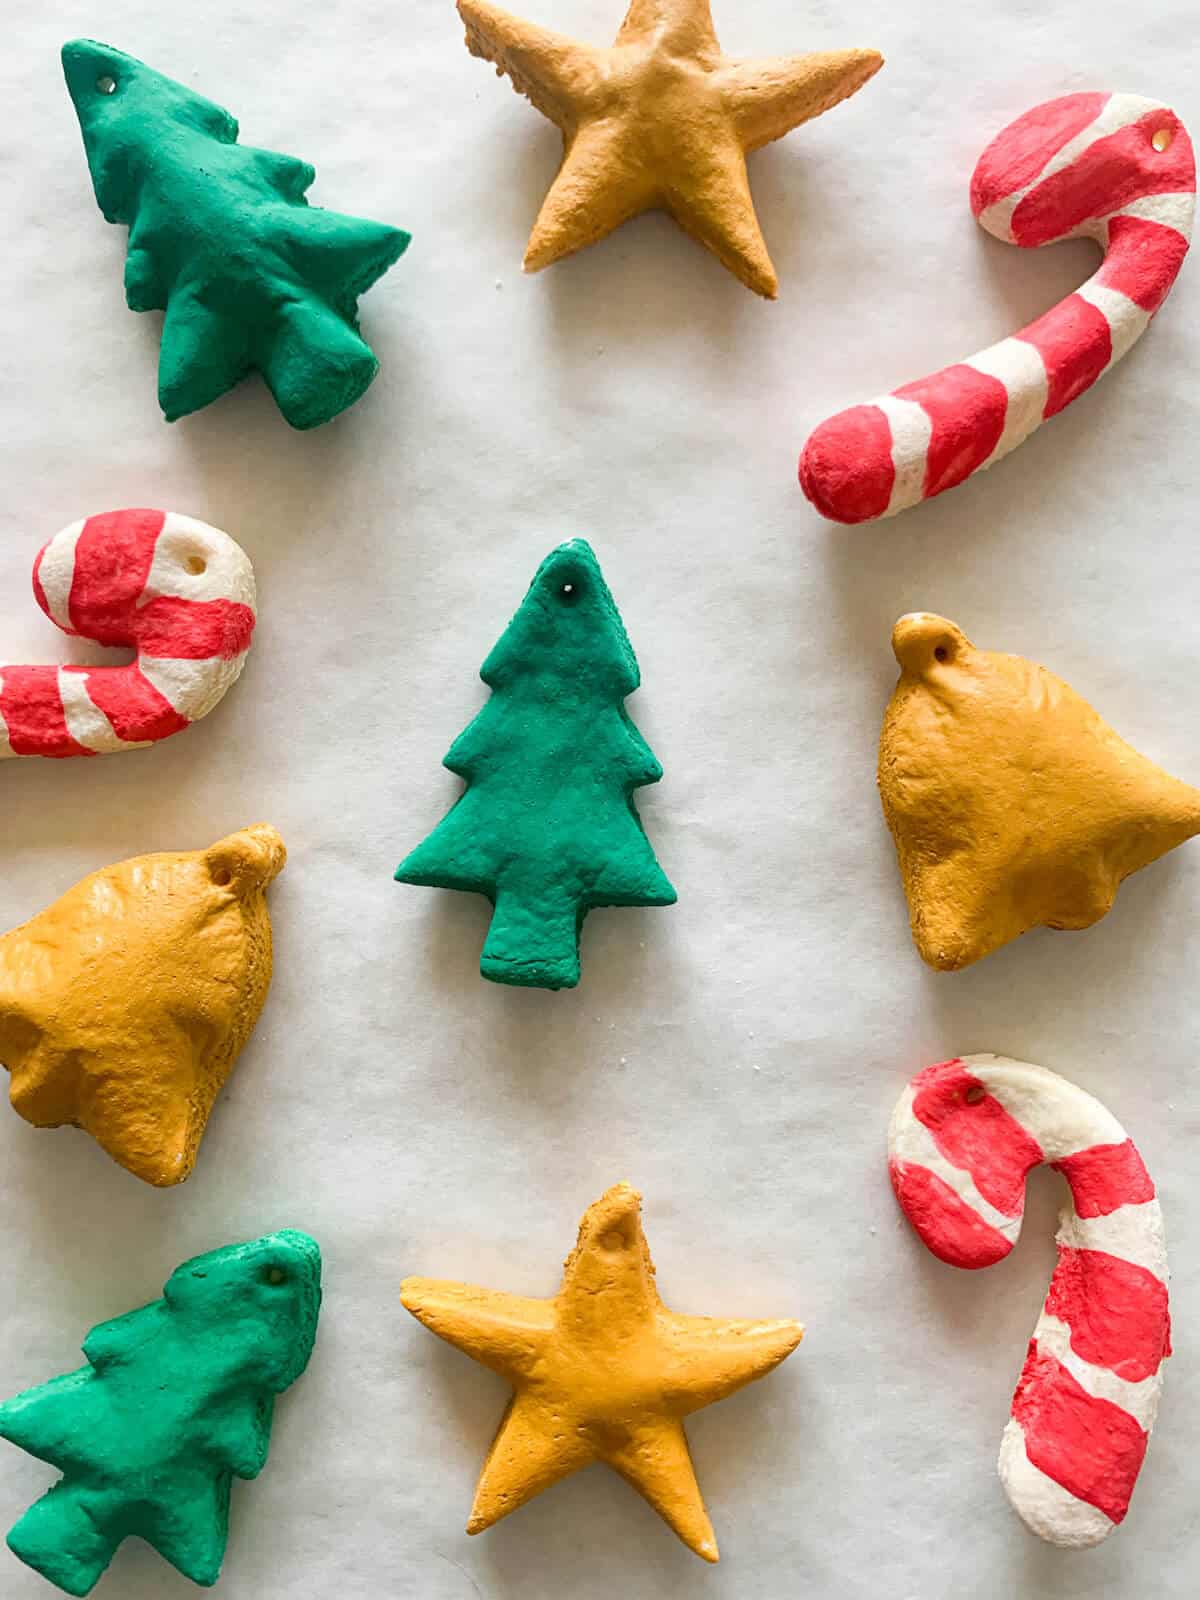
- Christmas ornaments - take cookie cutters and cut out the shapes you need.
8. Peel away the remainder of the dough from around the cookies.
9. Repeat the process with the leftover dough that you have removed from the cutouts.
10. Use a chopstick, straw or skewers to make holes at the top of each shape if you will be using them as hanging ornaments. You can also use a fork or a toothpick if you want to add any decorations before baking.
11. Transfer the parchment paper to a baking sheet and preheat the oven to 300°F/ 150°C. To air dry it can take anywhere between 24 hours and 7 days, depending on the moisture and warmth of the room, thickness of the dough etc.
12. Remove from the oven after an hour. They should be hard when they come out. Once dry and cool, paint them or decorate them with non-toxic paint. Once dry from decorating thread a ribbon on them and hang them on the tree.
Best paint for salt dough
You can use whatever paints you have on hand as long as they are non-toxic and safe for children to use (if you are making it with children). We use non-toxic acrylic paints. But remember, even if the paint is non-toxic that does not mean that it is safe to be ingested.
If you are worried about using any craft paint you can leave them as they are, and before they go into the oven decorate them by making shapes or holes in them with a toothpick or fork.
How to preserve salt dough ornaments?
You can preserve and seal salt dough by painting a coat of decoupage glue over them or spraying them with polyurethane spray.
However, neither of these methods are necessary as the salt acts as a preservative itself.
Store in airtight containers between uses.
Variations
- Cinnamon dough ornaments - to the below recipe add ¾ cup of cinnamon. The ornaments will then turn brown and smell like cinnamon
- Gingerbread salt dough ornaments - add ¾ cup of gingerbread spice or make your own mix of gingerbread spice (3 tablespoon each cinnamon and ginger, 1.5 tablespoon each cloves, nutmeg and allspice)
- Gluten-free salt dough - if your kids have any gluten sensitivity then you can make the same dough by just using gluten-free flour instead of all-purpose flour
- Add food coloring - before baking or air-drying add food coloring to have colorful decorations
Top Tips
- Use the cheapest flour and salt you can find – you're not eating these so it really does not make a difference
- When making the dough if it is looser add more flour, if it is too hard add more water. It should be a nice dough ball when finished with kneading
- Let the ornaments fully cool before paining them
- Store them in bubble wrap between holidays to reduce their moisture exposure
FAQ
The salt within the dough does a great job on preserving these but if you want to make sure they last even longer and the decorations keep you can use Mod Podge or spray each side with a coat of polyurethane spray. I personally don't because I like to keep things as non-toxic as possible.
This sometimes happens. To minimize this you can keep the oven on lower and bake for longer. However, for some shapes like the bells puffing up works.
You can, but they may crack more. If you do want to make them thicker, once you cut them thicker just bake them for longer.
I prefer the baking because it is quicker but you do run the risk of having them puff up. With air drying the salt dough creations stay the same but it can take up to 7 days for them to dry.
Salt dough handprints ornaments and creations are made ahead of time and can be used for years to come as the salt acts as an preservative. You can also make the dough ahead of time just store it in an airtight container before you are ready to make the creations and bake or air dry.
The following recipe makes about 20 ornaments.
Other recipes to make with kids
- My son loves making these naturally sweetened Gingerbread cookies that are decorated with a super easy royal icing
- Or these delicious no-bake Healthy Ferrero treats
- or play a game with your kids to try and list as many foods that start with e as they can
- a great toddler sensory bin activity is this easy DIY homemade Moon Sand
If you like this recipe, rate it below and leave us a comment.

Easy Salt Dough For Ornaments and Handprints
EQUIPMENT
Ingredients
- 2 cups all-purpose flour
- ½ cup table salt
- ¾ cup warm water
Instructions
- Take a large bowl and mix the flour and salt.
- Add warm water bit by bit while slowly stirring.
- Stir until a dough starts forming. If it is too loose add a bit more flour, if it is too firm add a tiny bit of water until you get the right consistency.
- You should have a nice dough ball. To use it as salt clay to play with just place the dough in a sealable plastic bag and remove all the air so it does not dry out. It can last like this for weeks.
- To make ornaments or handprints/footprints lay the dough between two pieces of parchment paper and use a rolling pin to flatten it out.
- Flatten it out until it is about ¼ inch (approx. ½ cm) thick.
- Create the ornaments/crafts you want- Handprints/ footprints / pawprints - take a cereal bowl and cut a large round shape and then press the print into it- Crafts like dinosaur fossils - cut a round shape with a cookie cutter or larger mug and press the dinosaur shape into it- Christmas ornaments - take cookie cutters and cut out the shapes you need.
- Peel away the remainder of the dough from around the cookies.
- Repeat the process with the leftover dough that you have removed from the cutouts.
- Use a chopstick, straw or skewers to make holes at the top of each shape if you will be using them as hanging ornaments. You can also use a fork or a toothpick if you want to add any decorations before baking.
- Transfer the parchment paper to a baking tray and preheat the oven to 300°F/ 150°C. To air dry it can take anywhere between 24 hours and 7 days, depending on the moisture and warmth of the room, thickness of the dough etc.
- Remove from the oven after an hour. They should be hard when they come out. Once dry and cool, paint them or decorate them with non-toxic paint. Once dry from decorating thread a ribbon on them and hang them on the tree.
Notes
- Non-edible!
- Use the cheapest flour and salt you can find as it really does not make a difference
- If you think the dough is puffing up, reduce heat and bake for longer than the indicated time
- If the dough is still soft after an hour of baking bake for a little longer
- Let the ornaments fully cool before paining them
- Use non-toxic paint as it will most likely end up on skin and maybe even a kid's mouth.
- Store them in bubble wrap between holidays to reduce their moisture exposure


Comments
No Comments